Michele Rosenbaum, VMD, DACVD
Taking Fear, Anxiety, and Stress out of the Dermatology Appointment
In part one, we discussed how itch may cause stress and anxiety in dogs and their owners, and how it can weaken their special bond. We stressed the importance of having customer service representatives (CSRs) avoid phone fixes, instead scheduling an appointment when owners call about their itchy dog.
Now that the pet owner has an appointment, here are key steps that the CSR can take to ensure a successful dermatology visit:
- Ask owners if their pet gets anxious or stressed during veterinary visits, and if needed, have the veterinarian prescribe anxiolytic medications to be given to the pet prior to the visit. Download the Fear Free Pre-visit Drug Chart to learn more.
- Have owners fill out a dermatology history form when they check in with the CSR.
- Have owners bring all their dog’s previous medications to the appointment.
- Ask owners not to bathe the dog before the appointment.
- If medically appropriate, ask the owner not to feed the dog before the appointment and to bring tasty treats to be used as food rewards during the appointment and procedures.
- Have dogs who are anxious at the veterinary clinic and dogs with obvious skin infections (who may spread methicillin-resistant infections) wait outside with their owner (if temperatures are reasonable) and then call or text when ready to see them, taking them directly to a designated dermatology exam room stocked with all needed supplies and equipment.
Veterinary technicians also play a key role in dermatology appointments:
- Go over the history form and ask clarifying open-ended questions (“What concerns you about…” “Tell me more about…”) while showing empathy and concern.
- Help the owner to understand how to use an itch tracker to gauge their dog’s level of itch to bring back to the next appointment.
- Make up a dermatology toolbox with supplies needed in the designated dermatology exam room: flea comb, #10 blades or spatula, mineral oil, glass slides, cover slips, clear tape, gloves, cotton swabs, culturettes, alcohol wipes. This reduces the need for staff to go in and out of the room looking for supplies or to move the patient to the treatment room, which can lead to fear, anxiety, and stress (FAS) in many dogs.
- Perform flea combing.
- Keep treats in pockets to give to dog during procedures to decrease stress; use owner’s treats if patient has food allergies.
- Ready the room for the Fear Free dermatology exam:
- Pheromone diffusers, spray pheromones on staff/ vet clothing, bandanas for dogs
- Use non-slip yoga mats, blankets, and towels on floor, exam table
- Lickimats spread with spray cheese or peanut butter
- Help the veterinarian to perform the basic “Derm Database” such as skin scrapings and skin and ear cytologies.
- There is a comprehensive NAVTA virtual dermatology diagnostics course available for technicians at ce.navta.net.
- Go over written discharge instructions with owners to help improve compliance, and review all medications, including dosing and instructions for administration or application.
The veterinarian then performs a thorough dermatologic physical examination and basic dermatology diagnostics. Dermatologic diseases are often chronic and recurrent; these same techniques are repeated on the same patient on multiple visits throughout that patient’s life. Veterinarians and staff must not induce FAS responses during initial visits with dermatology patients; otherwise, pet owners may avoid rechecks and needed treatment, negatively impacting the patient and pet owner’s emotional wellbeing.1
Treats can be given to distract the dog during the exam to reduce anxiety. A LickiMat™ works well and can be spread with spray cheese or peanut butter. With the owner present, examine the dog where they are most comfortable, such as the floor with a non-slip mat for larger dogs and the exam table covered in a warm fluffy blanket for smaller dogs.
Start the exam with less sensitive areas such as the back and chest before slowly and continuously moving to more sensitive areas with a higher density of nerve endings such as the face, ears, paws, axilla, groin, and genital areas. Lifting the patient gently up on their hind legs to examine the underside may be less stressful for some smaller patients than laying them down. Gently scratching the itchy spot with one hand can help relax the patient during the exam. Clip or scissor hair if needed, especially in folds. Move slowly with dogs who are afraid of the sound of clippers, especially near their head or around sensitive areas. Note lesion types, symmetry, and patterns. Consider taking digital photos to track progress.
- Early clues of allergies: mild erythema on the medial aspect of the pinna, medial elbow, caudal metacarpals, and interdigital spaces
- Common signs of more chronic allergic skin disease: alopecia, brown paw staining, hyperpigmentation, and lichenification
Common Patterns:
-
-
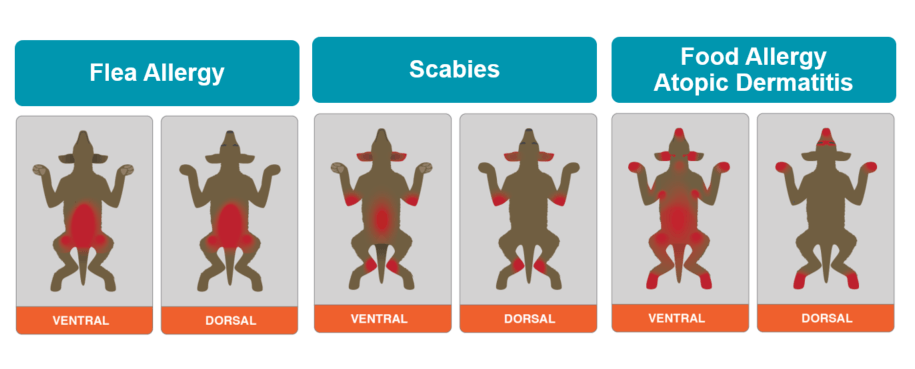
- “Pants pattern”: dorsal rump, tail base, groin, and caudal thighs=flea allergy dermatitis
- Ear margins, elbows, hocks, ventrum=scabies
- Facial, pinnal, axillary, ventral, pedal lesions=food allergy or atopic dermatitis
- Food allergy can also present with “ears and rears” with pinnitis/otitis and perianal lesions.
Perform procedures with the owner present in the exam room to reduce FAS in the patient due to being away from the owner and moving in and out of the room. Start with the least invasive techniques first (impression smears) and leave more invasive techniques (skin scrapings) for last. Scratch gently adjacent to the area where you want to do an impression smear or scrape, while your technician is feeding treats to the patient, or use the LickiMat™ to provide treats. Check in with the patient; stop and take a break if necessary. If the patient is too painful or stressed then abandon scraping and perform a hair pluck instead.
Hair plucking or tape impressions are alternatives to skin scraping for Demodex in sensitive areas (periocular, paws). These techniques cause less discomfort and require less restraint, reducing FAS. Use curved mosquito hemostats to quickly and gently pluck 10-20 hairs from the lesion, then examine in mineral oil. For the tape technique, press clear tape onto the skin and squeeze the tape and skin for 2-3 seconds, 2-4 times, then peel off the tape and place onto a glass slide. If you find mites with hair plucking or tape impressions, there is no need to scrape. If no mites, then you can decide if returning for deep scraping is needed to rule out mites.1
Otoscopic exam: The ears are particularly sensitive, and any manipulation has the potential to induce an FAS reaction. For acute otitis, particularly if painful and erosive-ulcerative, limit your awake exam to the canal opening and most proximal portion of the vertical canal. Start with food rewards and a calm and gentle touch on the shoulders. Move the hand from the shoulder to the neck, then the base of the ear, then lift the pinna, then touch the opening to the canal. Then shine the otoscope without touching the canal, gently touch the tip to the canal, then advance the scope into the vertical canal with the ear in the resting position, keeping the scope tip centered in the lumen. Gently extend the pinna and lower the otoscope in a single smooth movement, permitting visualization of the horizontal canal and tympanic membrane. Be gentle and don’t linger too long. Reward the patient.
Ear cytology: Leave the ear in the relaxed position and enter the center of the canal lumen and rotate gently in the vertical canal. Avoid scraping the side of the canal or trying to remove debris with the cotton swab, which can lead to canal erosions and FAS.
Use reversible sedation and pain control if needed for dermatology examinations, otoscopy, and procedures to reduce FAS in the itchy patient. Often sedation allows for a more thorough skin and ear exam and makes collection of samples easier and quicker. Click to download the Fear Free In Clinic Sedation Drug Chart.
A helpful resource for your animal care assistants and groomers is the Skin Health for Support Staff poster. One side shows common signs and patterns of skin disease; the other shows images of common skin problems like allergies, hot spots, and infection. By referring to the poster, which can be hung in the treatment room, kennels, or grooming areas, support staff can recognize signs of skin disease and quickly get a veterinarian to examine the pet before the problem gets worse. This resource is available by request from your Zoetis sales or technical services representative.
Remember, you as the patient’s veterinary professional team can work together to provide real relief of the stress and anxiety of itch for your patients, and this provides peace of mind for pet parents.
Next up: Part 3, Getting itch and inflammation under control with targeted treatments.
This article was reviewed/edited by board-certified veterinary behaviorist Dr. Kenneth Martin and/or veterinary technician specialist in behavior Debbie Martin, LVT.
References
1. Angus JC. Reducing fear, anxiety and stress in dermatology. Proceedings VMX 2019.
-
- 2. Angus JC. Otitis externa and the fear-free approach. Proceedings VMX 2019.
-